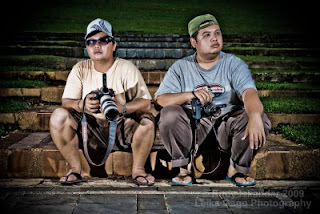
Ok, mungkin korang bertanya-tanya camnei mok molah stail dave hill yang glamer pemes fantabulous ya. Ha, mun tak orang sik tauk sapa Dave Hill nya tok adalah seorang jurugambar yang glamer telah memberi banyak inspirasi kepada jurugambar-jurugambar lain nak molah editing camnya. mun sik tauk juak nah gi
http://www.davehillphoto.com/How to get the Dave Hill look?. well take a look at the step below.1-Ok memula, untuk dapatkan gambar kedak-kedak Dave Hill. pastikan anda mempunyai 3 set lighting / 3 set flash yang disetup secara 45 degree each.
make sure you have at least 3 lighting setup to do Dave Hill Effect. whether its set of flash, or studio lighting.set up 45 degree at back, front left and right2-lepas ya, shoot dalam format RAW!. RAW ok, mun CANON, RAW!, mun NIKON NEF!, Mun SONY, ARW sik salah
Shoot in RAW format!3-ok, bukak photoshop tak orang, mun sekda lightroom boleh juak. ambik ko setting tok
open up your photoshop or lightroom, and do this setting.* Recovery = 100
* Fill Light = 100
* Blacks = Drag this slider to the right until photo looks balanced again, because setting the Fill Light at 100 will wash the photo out
* Contrast = 100
* Clarity = 100
* Vibrance = 100
* Saturation = -81 (Drag the saturation all the way to the left, to -100 (which removes all color, making it a black and white image), Then slowly drag back to the right until some of the color starts to return to the image.If after making these settings, the image looks way too bright, you may have to decrease the Exposure just a little bit, by dragging the Exposure slider to the left. If it’s too dark; increase the Exposure (so basically, those are starting points).
4 Lepas ya, kitak orang savekan image tek jadi Jpeg, bukak kei Photoshop!
Save your image as Jpeg then open up in Photoshop!5-Duplicate layer, gambar nak dibukak tek, nok layer atas ya, kitak orang pergi Filter, blur, Gaussin Blur. set secukup rasa.
Duplicate the layer, then go to filter, blur and gaussian blur. set it up nicely!5-kurangkan opacity kepada 50 persent. Opacity rah kat layer debah belah kanan!
reduce opacity to 50 %6-sekarang carik history brush. lap-lapkan gambar rah mulut, mata, saknya sik jadi soft gilak entam gaussian blur. lekak ya save!.
Now find the history brush, brush up the mouth the eye where you dont want it to get soft with gaussian blur.Save after doneNah.jadilah gambar kedak2 dave bukit kita.ok!
now you have that almost Dave Hill look picture!


